|
White Forest RNG Guide
Similar to manipulating the RNG for a roamer, the process of manipulating the RNG in the White Forest is one of the hardest Standard Seed abuses in the 5th Generation games. Sweet Scent does not work in the White Forest, so you must rely on running through the grass to trigger an encounter. Meanwhile, the falling leaves in the overworld and the wandering NPCs continuously advance the PIDRNG frame while you are trying to initiate an encounter. This guide will walk you through the most efficient method to controlling the PIDRNG in the White Forest to acquire a shiny Pokémon. As an example, we will RNG a shiny Porygon. Prerequisites
Finding SeedsThe White Forest uses a standard wild (grass) encounter method. In the Time Finder, select a method of "IVs (Standard Seed)" and an encounter type of "Wild Pokémon." If you are after a Pokémon that appears in the water rather than the grass, you would select "Wild Pokémon (surfing)" instead. The "min/max Frame" can be set to 1; however, since we'll be running around to initiate the encounter, you can set the max frame to higher. Recall that the IV frame is increased by X every 128 steps for X Pokémon in your party. This guide assumes a min/max frame of 1. Leave the encounter slot set to Any. The encounter slots in the White Forest do not behave as normal. To make the process as easy as possible, set up your White Forest so that the Trainer who causes your desired Pokémon to spawn is the only one left in the area. The Trainers leave over time as their happiness decreases for each day that passes when you don't visit White Forest or talk to them. You can exploit this by changing your DS clock to a few minutes before midnight and waiting a few minutes past midnight in-game. The clock must roll over in-game for this trick to work. Repeat as necessary until only your desired Trainer remains. A more detailed process can be found here. Filter the IVs as desired before clicking "Generate" to search for seeds (see the first 3 sections of this guide if you need a refresher). Because Synchronize can be finicky in the White Forest, set your desired nature in the drop-down and do not check "Synchronize Frames Only." Here, we are looking for a Calm Porygon with 31/x/31/30/30/31 IVs (Hidden Power Ground). Because Porygon is genderless, we set the gender ratio to "Fixed Gender" to prevent any useless Cute Charm results from showing up. Although we are looking for a shiny, do not click the "Search for Nearby Shiny Frames" checkbox. Click "Generate" and wait for the process to finish. If a seed appears that you like, you can cancel searching in the menu that pops up. Once you find a seed to your liking, right-click on the result in the Time Finder and copy the seed to the clipboard. You can refer to the image below to double check your setup. As you can see, we will be trying to go for the frame that is highlighted in blue: Calm Porygon with 31/0/31/30/30/31 IVs (Hidden Power Ground). 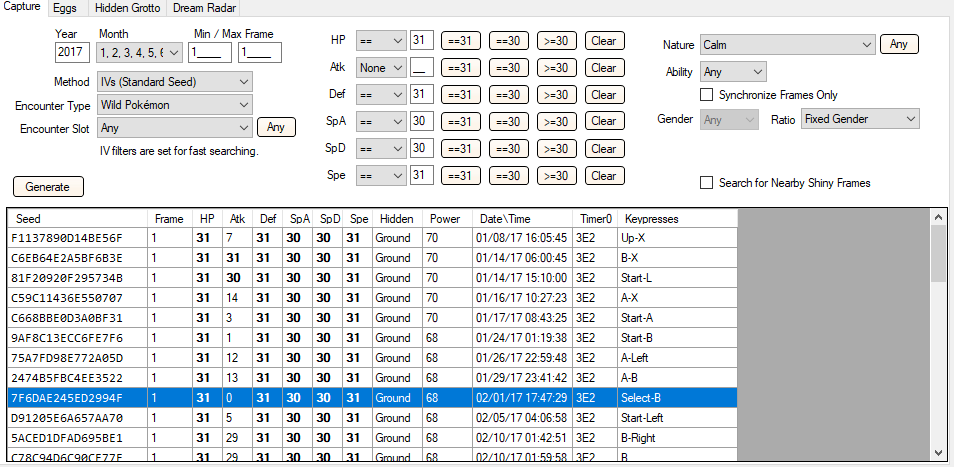
Main Window SetupIn the main window of the RNG Reporter, select "Gen 5 PIDRNG" from the method drop-down and set the encounter type to "Wild Pokémon." Next, paste the seed of the spread that you'd like into the "Seed (Hex)" box. If you have already triggered the event for Tornadus/Thundurus to roam, tick the "Roamer Released" box and then click on the "Calculate Initial PIDRNG Frame" button. If you have not triggered that event, leave the "Roamer Released" box blank and then click on the "Calculate Initial PIDRNG Frame" button. We have not released the roamers in our game yet so this guide will not have the "Roamer Released" box ticked. Now hit "Generate." The image below will show everything we just described. 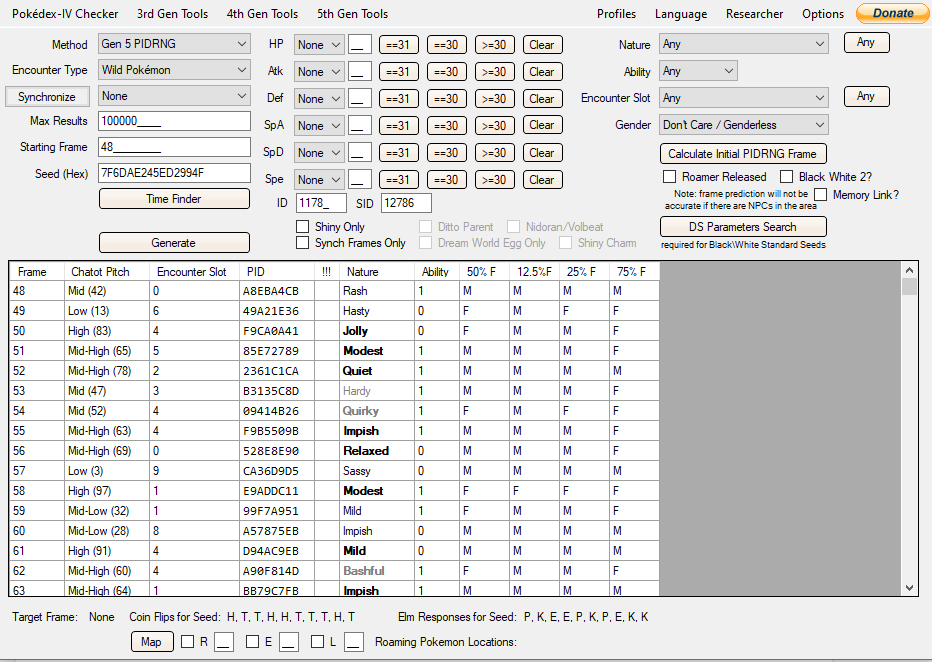
Next, right click on any frame and choose the "Display Characteristics In Search" at the bottom. It will ask you to input "IVs from RNG," so put in the IVs that you are trying to RNG. Since the IVs we want are 31/0/31/30/30/31, we will put them in and hit "OK." 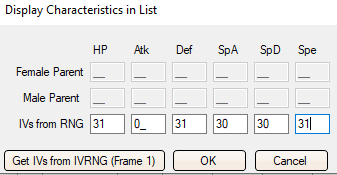
Your main window should now look like this: 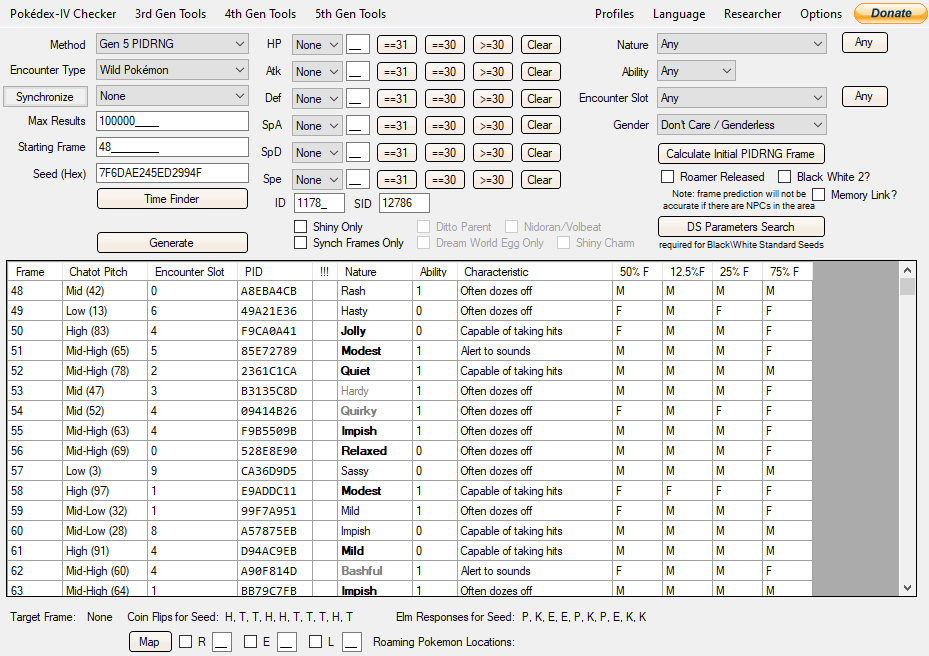
CalibrationThe first time you enter White Forest, you are very likely to encounter a Pokémon on your first step into the grass. On each attempt, capture the Pokémon you encounter and compare its nature/gender/characteristic/ability to the frames in the main window of the RNG Reporter. For this part, have the necessary materials needed to calibrate, such as Chatot, to advance/check frames and the Poké Balls needed to capture your Pokémon. Have a Pokémon with Synchronize and the nature you want in your party, but do NOT have it at the front of your party yet. Once you have the necessary materials, we recommend standing and saving inside the house near the gate towards Route 15, as shown in the image below, to make the process of running towards the grass patches more convenient and to avoid NPCs advancing frames. Once you are prepared, you will calibrate by exiting the house and finding a path to the grass that consistently gives you an encounter on your first step into the grass. Do this process of exiting the house and walking into the grass multiple times, resetting after each attempt, to make sure your results are consistent. 
Tip: While calibrating, you should use one of the two patches of grass circled in red below, since they spawn consistently. We highly recommend NOT using the grass patches that are crossed out (or any other patches) to calibrate as they are not consistently spawned once you restart the game after this calibration. For this guide, we will be using the smaller grass patch that is circled in red on the left. 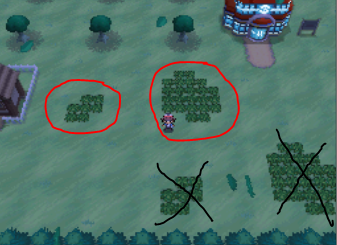
Work out a comfortable path to the grass that gives you an encounter upon your first step into the grass. Once you find a path to the grass that gives you a first-step encounter, memorize this path. It doesn't matter which path you take, but it is important that you do everything consistently. That includes the path taken and if you are walking/running/biking. In this guide, we will walk the path shown below, since it consistently gave us a first-step encounter upon leaving the house. Tip: If you are not consistently getting first-step encounters, you can "force" one by walking 25+ steps inside the house and re-saving before resuming calibration. You should now be getting first-step encounters for every frame for your path. It is necessary that every frame gives you a first-step encounter; otherwise, the RNG will be inconsistent. 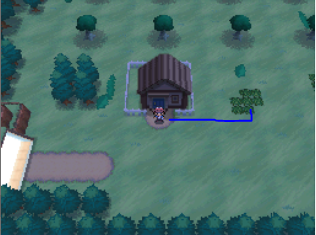
As a safety precaution, work out how many steps you take outside the house before entering the grass. If you do everything consistently, you shouldn't need this number. However, if you forget your path, you can create a new one later on which takes the same number of steps. Do not worry too much about keeping the number of turns the same as the original path. Turning + walking in 1 motion is considered 1 step. The blue path shown is 8 steps walking right and one step upward to get to the grass patch, for a total of 9 steps. This action is to be taken immediately upon leaving the house for consistency. Now that you've had everything set up and figured out your path once you exit the house, it is time to set your DS to the time and date required to hit your seed. Tip: Before actually doing any RNG, go into the game once you have changed the time and date, and go outside the house to allow the game to change to the correct season. Walk back inside the house and save at the position near the exit as before. Once the above has been done, you can now attempt to hit your seed. Do not turn on C-Gear when you enter the game. Use Chatot pitches to verify that you have hit your seed. Once it is verified, advance towards any frame and make note of the frame you've stopped at (using 0 Chatot Chatters is a good place to start, though you will be unable to verify your seed). Now exit the house and immediately head towards the grass patch using the path you have chosen. Capture the Pokémon you've encountered and check its nature, ability, and characteristics to see which frame you actually hit. There are 3 possible scenarios that can happen regarding the nature:
In our example, we got scenario 1. We advanced our frames inside the house and stopped at frame 93, as shown below. 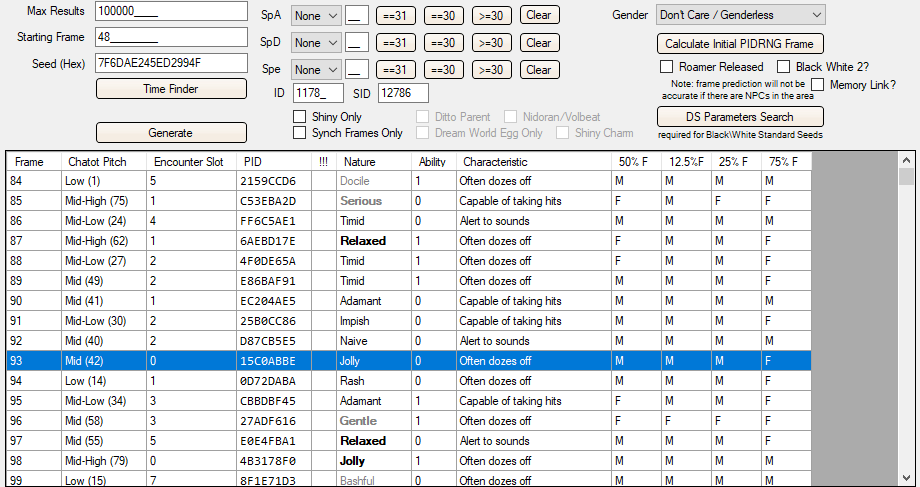
We exited the house at frame 93 and immediately walked towards the grass using our path to initiate an encounter with Porygon and captured it. Here is the Porygon we caught: 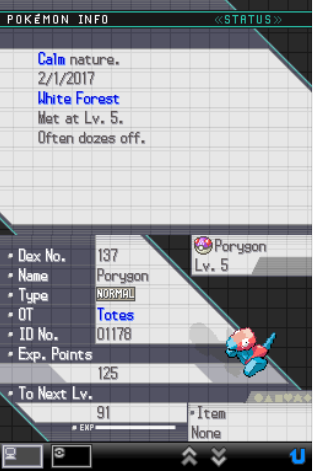 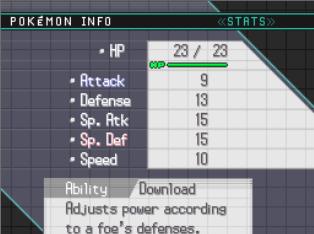
Comparing its information (Calm nature and ability 1 for Download) to the main window, we find that we hit frame 119, as shown below, since it matches the "Often dozes off" characteristic. We also see that this frame is also Synchronize-able since the nature is highlighted in bold, but it is the nature we already want so we do not need Synchronize. 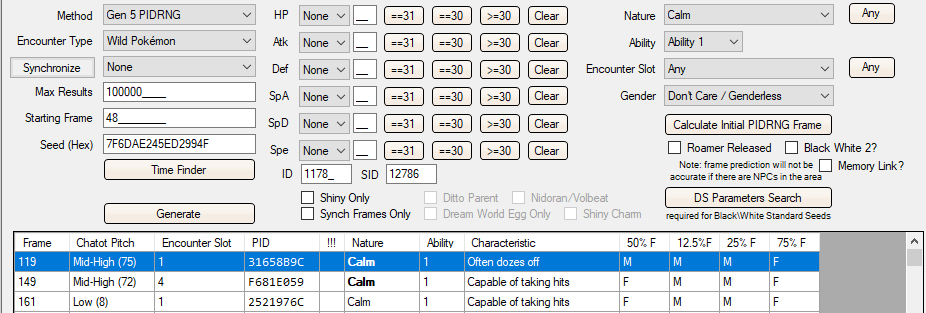
We triple checked to confirm that we hit frame 119 every time we exit the house at frame 93, and so we will now move on towards RNGing the TID/SID. If you are not after a shiny Pokémon, your job is practically done! Continue the process of hitting your seed, advancing the frame, and running into the grass until you finally get your desired characteristics. If you find that you are advancing the IV frame, run inside the house a bit and resave your game before hitting your seed again. Obtaining Your Desired IDsThe process of RNGing your IDs to make a frame shiny is covered in Part 4 of this guide. We will be using our PID of 31658B9C on frame 119 to search for a TID/SID combo that will make frame 119 shiny. As shown in the image below, we will be RNGing for the highlighted TID and SID. 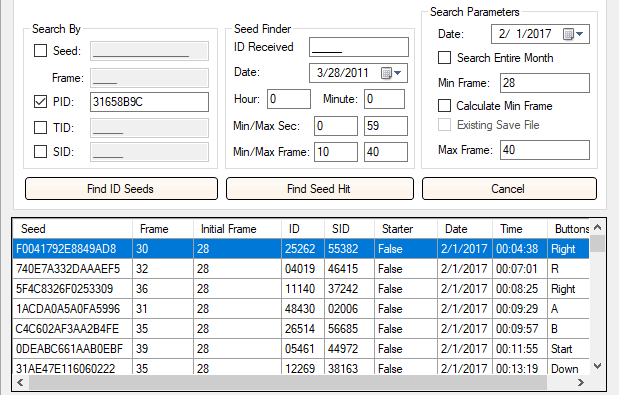
It is important to test to see if the TID/SID combination you are going for will make your target frame shiny. Plug the TID/SID in the main window and hit "Generate" again. As shown in the image below, the TID/SID combination we are going for does in fact make the frame shiny. 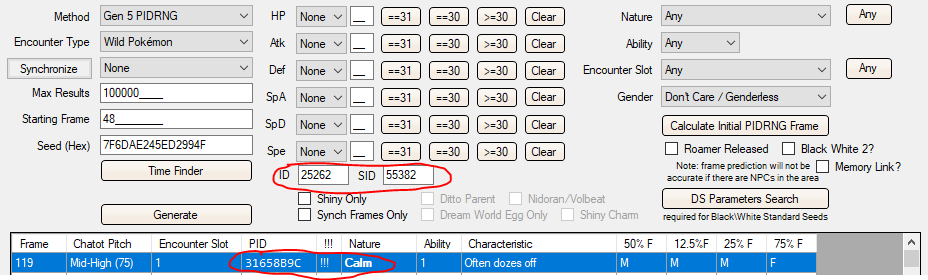
The steps in Part 4 were followed to successfully obtain our TID/SID, as shown below: 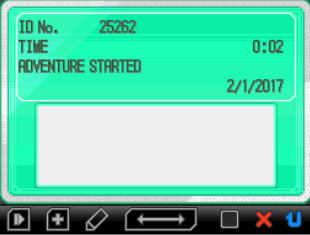
The RNGProceed to play through the game until you are able to enter the White Forest again. White Forest can be accessed immediately after beating the Elite 4. For faster runs, you may want to consider checking out our Black/White in-game tier list for building an efficient team. Enter the White Forest and save your game in the same location you used to calibrate. Hit your seed, and walk the same path you did before to get your first-step encounter and, now, shiny Pokémon! Remember to change the date and exit/re-enter the house before saving to skip the weather change animation. Further, if you are not getting a first-step encounter along your path anymore, you can walk 25+ steps inside the house, re-save, then hit your seed again. If you did not get the right Pokémon, it's likely that your Timer0 shifted and all you have to do is try again. Because you confirmed you could hit your frame during the calibration process, the actual RNG shouldn't have many surprises. Even if it is shiny, however, make sure you double check you aren't advancing the IV frame by confirming its IVs! Since the Pokémon will be level 5, the IV checker in Nimbasa City's Battle Subway may prove useful. To determine the IVs you actually got by tripping the 128 step counter, you can show the IV frames in the main window by temporarily changing the Method to "Gen 5 IVs (Standard Seed)." The encounter method remains "Wild Pokémon;" set the starting frame to 1. Upon clicking "Generate," you should see a list of all the IV frames. If the 128 step counter was tripped, the IV frame will be increased by X for X Pokémon in your party. So, if you have 5 Pokémon in your party like us, the IVs would come from frame 6 if the counter is tripped (frame 1 otherwise). The easiest method for a quick check is to compare the characteristic you got with what you'd expect from the IVs. After replaying Pokémon White with our RNG'd TID/SID, we were able to successfully encounter a shiny Porygon using the same steps we did in our calibration. 
As shown below, however, our first attempt did not yield the correct IV frame as the characteristic is "Likes to thrash about" and not "Often dozes off," as reported in the main window. This means that the IVs we received are not 31/0/31/30/30/31. 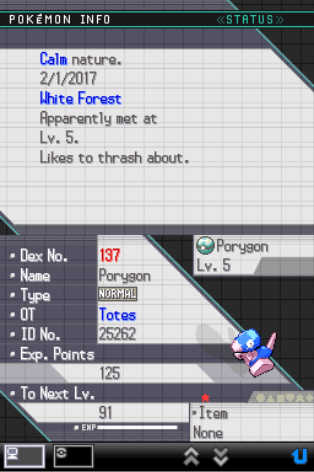
Since it was not the correct IV frame, we re-did the RNG. This time, we walked around in the house a little bit to shift the IV frame and then saved near the exit of the house as before. We hit our seed again and then followed the same steps as our calibration. As shown below, this attempt was successful. We both encountered shiny Porygon and hit the correct IV frame of 31/0/31/30/30/31, indicated by the correct characteristic of "Often dozes off" the main window reports. 
Alternative MethodIf you do not want to go through this lengthy process, you can technically acquire your desired shiny Pokémon by treating it like a standard Wild encounter RNG. However, due to the erratic nature of the advancements from the NPCs, the environment, and the uncertainty in the steps needed to encounter the Pokémon, you'll need to advance the frame one-by-one with Chatot and check every result. It's even possible that with more Chatters, you'll hit an earlier frame. You may also find that your desired frame is skipped, requiring you to find a new seed and start the process over. This method is certainly doable, but will require a lot of trial and error and may end up taking longer depending on how lucky you are. ConclusionAbusing the RNG to get a shiny Pokémon from the White Forest will likely be one of the lengthiest RNG projects you'll attempt. The process itself is rewarding, however, and certainly worth some bragging rights when you pull it off! |