X’s Scratch Spriting Guide
So, due to request, I have created my first spriting guide detailing my personal method of Scratching. My method is completely different from TCoD’s, so don’t pretend that this is going to look anything similar. This guide uses my Bronze Koffing trophy as an example. This guide also assumes you know how to sprite already, and are just getting around to scratching, and that you are using the standard Paint program. So, without further ado, let’s start Scratching!
~~~~~~~~~~~~~
Step 1
Draw it out.
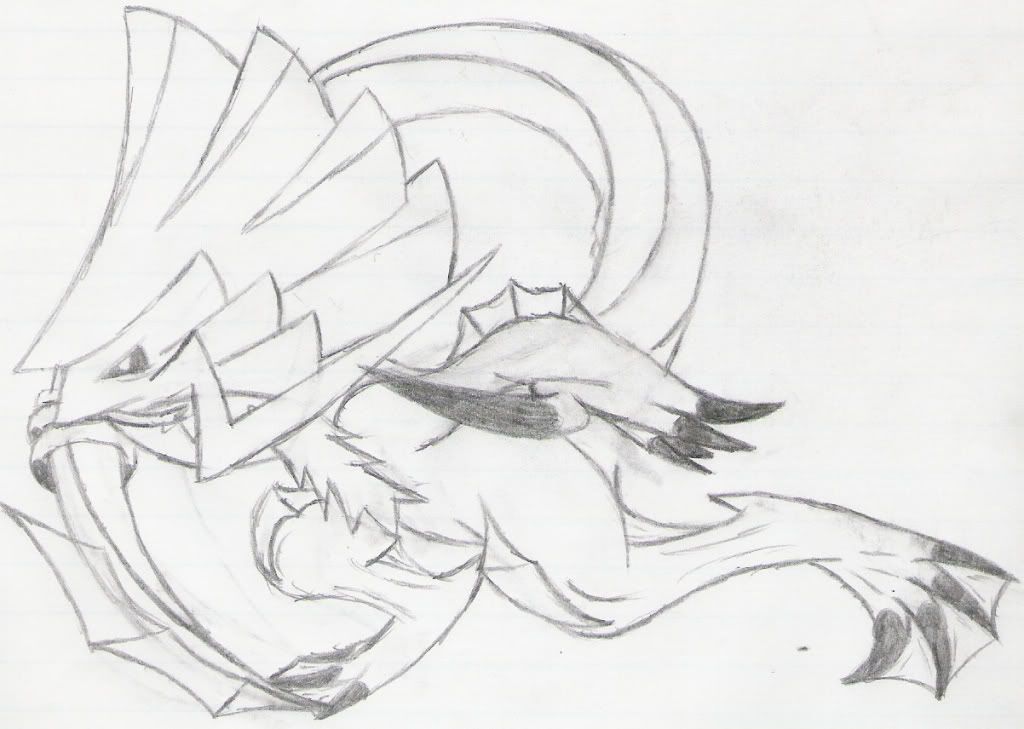
So I’m guessing you probably weren’t expecting this to be in here. But yes, It is my honest belief that every good scratch begins with a hard copy of the pose and whatnot. Try to start your sketch with a good idea of what you’re looking to draw. If it’s a fakemon you’re trying to sprite, do a few concept sketches first, and get the idea firmly in your mind. Remember, the most important part of drawing is to be patient and to keep a light, steady hand. Only darken your outline when you’re done with the rough sketch. I also recommend, for straighter lines, that you should draw with many back-and-forth strokes, that way you can slowly curve the line, and if you make a mistake, you can correct it in the backstroke.
Step 2
Scan and Resize
Now that your masterpiece is finished, you can scan it. After you’ve scanned it, make sure it’s got reasonable proportions. A variety of sites (even PhotoDraw, if you have the program) can resize pictures, so go out and find one. If you don’t know one, most image hosting sites carry an image editor that can do this task.
Step 3
SAVE AS PNG
Trust me, even though this is the simplest step, it’s probably the most important. If you don’t save sprites as PNG, they’ll lose quality, so even if your sprite is a masterpiece, the compression from saving it as JPG, BMP, or anything else, it will look bad.
Step 4
Clean up the Scan
Whoo! Now we get to the fun part, aka, Spriting!
Looks pretty grimy right now, huh? Yeah, that’s because the paper has imperfections in it which shows in the scan. And because scanners auto-save images as JPG. Now do you see what I meant when I said save as a PNG? Thought so. But anyway, before we fix that, we need to draw the lineart. So, now we will fix up the outline using the scan as a base. If you had a little too much detail in your original art, and the compression makes it utterly incomprehensible, use the hard copy and figure out what the heck that smudge on the screen is, and adjust the outline accordingly.
Now that the lineart is there, you’re going to want to erase that filigree. Just select the base Paint White color and fill in with the pencil. If you want to make absolutely sure you erase all of it, color it instead with an easily visible color (green/pink) and then use the Paint bucket tool to fill in the green/pink background with White.
Remember also that this is your last chance to resize fairly easily. If it looks too big, don’t be afraid to fix it.
Now, doesn’t that look a lot better?
Step 5
Basecoat
Now, from what I’ve seen, most beginners like to use colors that they created by hand. This is not the way to go. Only create custom colors if absolutely necessary at first. Otherwise, steal them from an official sprite. When you become more experienced, you can start attempting your own palettes. Anyway, once you’ve selected you’re base colors, you’ll want to fill in your sprite with the base color, or the color in the middle of your palette (to the brighter side, if it has an even number of colors). Simple, right?
Now, I will demonstrate using Lopunny’s, Shiny Staraptor’s, Glalie’s, and Shiny Advance Pidgeot’s colors.
Yeah, simple indeed.
Step 6
Finish the job.
Now you’ll finish the job by shading in the entire thing. Another part which requires patience, Shading can take up the better part of an hour. Just remember to make sure it looks natural. Remember that in Pokemon, the light source is always from the upper left, towards the way the Pokemon is facing. Also, make sure the outline isn’t all black. Where the black is directed at the Sun, use the darkest shade of (adjacent color) that you have. Otherwise, it will look less official, and lack a quality that official sprites have.
Here is the finished product:
Now, it is time for the most important step: Step 7!
Step 7
BRAG!
You may now show off your work with pride. I actually wasn’t joking about this being important, though. If you show off your sprite around an experienced community, they WILL give criticisms, which WILL make you better; if you listen and try to fix what you did wrong/ could do better, you will get better. Heck, I evolved from criticisms, and developed my own method of Scratching from them. Honest. So remember, learn from your mistakes, everyone!
~~~~~~~~~~~~~
So, I hope you guys liked my first guide and found it useful. If you have any criticisms, tell me, and I will fix my guide, and hopefully make it better.