Underground Guide
- Introduction
- Activities in the Underground
Miles below the surface of Sinnoh lies a vast underground field ready to be explored, so pick up a shovel and start digging. Who knows what you'll find in this treasure-laden part of Sinnoh?
There are three main things to do in the Underground: treasure hunting, secret base activities, and the multiplayer Capture the Flag game.
- Treasure Hunting:
- Using a hammer and a pick you can dig at the walls of the Underground in hopes of finding rare items, such as Spheres, which can be traded to specific people you meet in the underground for Secret Base items, Fossils that can be restored to obtain certain Pokemon, Shards that can be traded for particular TMs, and useful battle items.
- Secret Base:
- The Underground allows players to build Secret Bases: rooms that can be furnished to a player's preference.
- Capture the Flag:
- The only actual multiplayer aspect of the Underground. Here players compete with each other in stealing others' flags that are located in their secret bases in hopes of being rewarded with a higher flag rank, which ultimately determines how far you can go in personalizing your Secret Base.
Each of these will be tackled in more detail one way or another throughout this guide.
All players begin their digging career by first obtaining the Explorer Kit from the Underground Man in Eterna City. From here you'll be assigned six missions; it's your decision if you'd like to complete these missions or not, but generally they give you a good idea about the workings of the Underground so it's to your advantage to complete them.
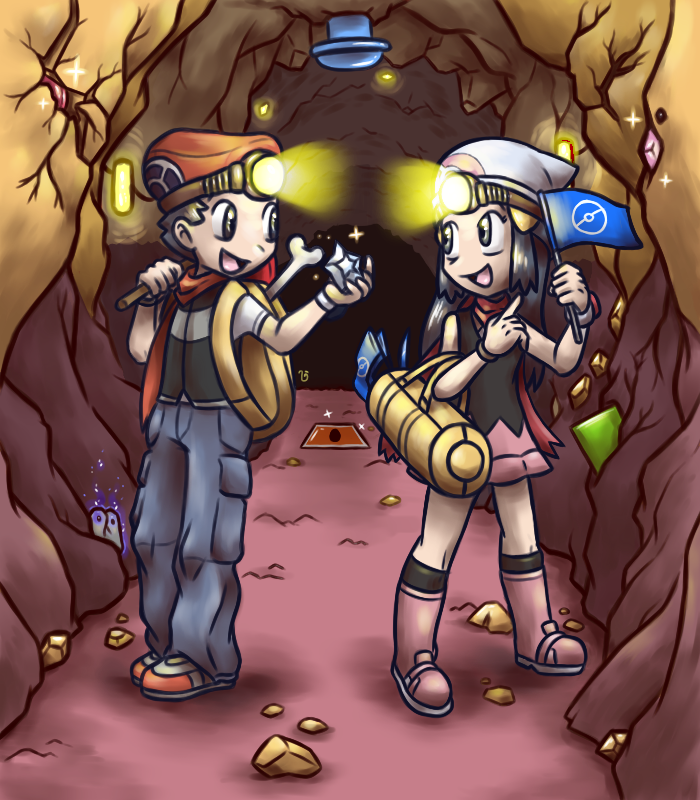
Once underground, you'll notice that the DS top screen will be filled with a rough but detailed map of the whole Underground. Where you are will be denoted by a red dot, treasures by an orange dot, and your secret base by a red square. The bottom screen will be where the "real" action takes place. Tapping the touch screen sets off a radar that detects nearby treasure/traps. A good rule of thumb to follow here is that those dots you see on the floor are either traps or buried spheres and those on the walls are treasures that haven't been dug out yet.
Items you obtain by digging:
- Battle items
- Evolution-inducing Items
- Heart Scales
- Pokemon Fossils (Bring all your fossils to the Oreburgh Mining Musuem to witness their restoration to their previous Pokemon form.)
- Spheres (There are three kinds of traders in the Sinnoh Underground; look for them to trade your spheres for items you can use to decorate your Secret Base.)
- Shards (Trade off all your Shards to the girl on Route 212 for rare TMs. You can also trade them in to move tutors in Platinum.)
Remember those dots I told you about? Well underneath all that sparkling on the walls lie treasures waiting to be dug out. You can use a combination of pick and hammer blows to successfully dig through the wall. Each tool has its own advantages and disadvantages. With the hammer you can dig large areas quickly, but the impact it causes results in the wall collapsing much more easily than when using the pick. The pick is more of a focused digging instrument: it allows you to work on a small specific area carefully. You don't have unlimited time to dig through the wall to obtain the treasures, as the walls have a tendency to collapse upon too much pressure from use of both tools. You can get a good idea of how much time you have by looking at the cleft above the digging area. Each time you use one of the tools this cleft will go from right to left. Once it reaches the left part the wall collapses and the treasures hidden behind it are buried forever. So be sure not to waste any particular blows to the wall, as you never know when you might need them to completely dig out a particular item.
The stuff you dig out of the Underground is automatically placed in a special bag that can only be accessed when you're underground, the Loot Sack; be sure to move those items you want to use outside of the Underground to your primary bag. Needless to say, the Loot Sack does not have unlimited carrying capacities, so be sure to transfer items frequently.
Here's a complete list of all the available things (decorative and battle items) you can find while digging in the Underground.
- Armor Fossil - Pearl only
- Blue Shard - More common in Diamond
- Blue Sphere
- Claw Fossil - More common in Diamond (after National Dex)
- Damp Rock
- Dome Fossil - More common in Pearl (after National Dex)
- Dragon Plate
- Dread Plate
- Earth Plate
- Everstone
- Fire Stone - More common in Diamond (after National Dex)
- Fist Plate
- Flame Plate
- Green Shard - More common in Pearl
- Green Sphere
- Hard Stone
- Heart Scale
- Heat Rock
- Helix Fossil - More common in Diamond (after National Dex)
- Icicle Plate
- Icy Rock - More common in Diamond (after National Dex)
- Insect Plate
- Iron Plate
- Leaf Stone - More common in Pearl (after National Dex)
- Light Clay - More common in Diamond (after National Dex)
- Max Revive
- Meadow Plate
- Mind Plate
- Moon Stone - More common in Pearl (after National Dex)
- Old Amber
- Pale Sphere
- Prism Sphere
- Rare Bone
- Red Shard - More common in Pearl
- Red Sphere
- Revive
- Root Fossil - More common in Pearl (after National Dex)
- Skull Fossil - Diamond only
- Sky Plate
- Smooth Rock - More common in Pearl (after National Dex)
- Splash Plate
- Spooky Plate
- Star Piece
- Stone Plate
- Sun Stone - More common in Diamond (after National Dex)
- Thunderstone - More common in Diamond (after National Dex)
- Toxic Plate
- Water Stone - More common in Pearl (after National Dex)
- Yellow Shard
- Zap Plate
- Alert Tool 1 - Goods Trader
- Alert Tool 2 - Goods Trader
- Alert Tool 3 - Goods Trader
- Alert Tool 4 - Goods Trader
- Alert Tool 5 - Goods Trader
- Beauty Cup - Mr. Goods
- Big Bookshelf - Goods Trader
- Big Oil Drum - Goods Trader
- Big Smoke Tool - Goods Trader
- Big Table - Goods Trader
- Bike Rack - Goods Trader
- Binoculars - Goods Trader
- Blue Crystal - Mr. Goods
- Blue Cushion - Goods Trader
- Blue Tent - Goods Trader
- Bonsai - Goods Trader
- Bonsly Doll - Veilstone Department Store
- Bronze Trophy - Battle Tower
- Bubble Tool - Goods Trader
- Buizel Doll - Veilstone Department Store
- Bulbasaur Doll - Goods Trader
- Buneary Doll - Goods Trader
- Charmander Doll - Goods Trader
- Chatot Doll - Veilstone Department Store
- Chikorita Doll - Goods Trader
- Chimchar Doll - Goods Trader
- Clear Tent - Goods Trader
- Clefairy Doll - Goods Trader
- Container - Goods Trader
- Cool Cup - Mr. Goods
- Crate - Goods Trader
- Cupboard - Goods Trader
- Cupboard Box - Goods Trader
- Cute Cup - Mr. Goods
- Cyndaquil Doll - Goods Trader
- Dainty Flowers - Goods Trader
- Display Shelf - Goods Trader
- Drifloon Doll - Goods Trader
- Ember Tool - Goods Trader
- Feathery Bed - Goods Trader
- Fire Tool - Goods Trader
- Flower Tool - Goods Trader
- Foam Tool - Goods Trader
- Game System - Goods Trader
- Glameow Doll - Goods Trader
- Glittering Gem - Underground Man
- Globe - Mr. Goods
- Gold Trophy - Battle Tower
- Green Bike - Goods Trader
- Gym Statue - Mr. Goods
- Happiny Doll - Goods Trader
- Healing Machine - Goods Trader
- Hole Tool - Goods Trader
- Iron Beam - Goods Trader
- Jigglypuff Doll - Goods Trader
- Lab Machine - Goods Trader
- Lavish Flowers - Goods Trader
- Leaf Tool - Goods Trader
- Long Table - Goods Trader
- Lovely Flowers - Goods Trader
- Mantyke Doll - Veilstone Department Store
- Maze Block 1 - Goods Trader
- Maze Block 2 - Goods Trader
- Maze Block 3 - Goods Trader
- Maze Block 4 - Goods Trader
- Maze Block 5 - Goods Trader
- Meowth Doll - Goods Trader
- Mime Jr. Doll - Veilstone Department Store
- Minun Doll - Goods Trader
- Mudkip Doll - Goods Trader
- Munchlax Doll - Veilstone Department Store
- Mystic Gem - Underground Man
- Oil Drum - Goods Trader
- Pachirisu Doll - Goods Trader
- Pikachu Doll - Goods Trader
- Pink Crystal - Mr. Goods
- Pink Dresser - Goods Trader
- Piplup Doll - Goods Trader
- Pit Tool - Goods Trader
- Plain Table - Goods Trader
- Plusle Doll - Goods Trader
- Pokecenter Flowers - Goods Trader
- Pokecenter Table - Goods Trader
- Potted Plant - Goods Trader
- Pretty Flowers - Goods Trader
- Pretty Gem - Underground Man
- Pretty Sink - Goods Trader
- Red Bike - Goods Trader
- Red Cystal - Mr. Goods
- Red Tent - Goods Trader
- Refrigerator - Goods Trader
- Research Shelf - Goods Trader
- Rock Tool - Goods Trader
- Rockfall Tool - Goods Trader
- Shiny Gem - Underground Man
- Shop Shelf - Goods Trader
- Silver Trophy - Battle Tower
- Skitty Doll - Goods Trader
- Small Bookshelf - Goods Trader
- Small Table - Goods Trader
- Smart Cup - Mr. Goods
- Smoke Tool - Goods Trader
- Snorlax Doll - Goods Trader
- Squirtle Doll - Goods Trader
- Test Machine - Goods Trader
- Torchic Doll - Goods Trader
- Totodile Doll - Goods Trader
- Tough Cup - Mr. Goods
- Trash Can - Goods Trader
- Treecko Doll - Goods Trader
- Turtwig Doll - Goods Trader
- TV - Goods Trader
- Vending Machine - Goods Trader
- Wailord Doll - Goods Trader
- Weavile Doll - Goods Trader
- Wide Sofa - Goods Trader
- Wide Table - Goods Trader
- Wobbuffet Doll - Goods Trader
- Wood Dresser - Goods Trader
- Wooden Chair - Goods Trader
- Yellow Crystal - Mr. Goods
- Yellow Cushion - Goods Trader
Three types of traders:
- Goods Traders (Trade spheres for items you can use to decorate your Secret Base.)
- Loot Traders (Trade the other stuff you come upon in the Underground for Spheres, such as battle items, Evolutionary stones, Fossils, etc.)
- Trap Traders (Trade Spheres for traps and vice versa.)
Your Secret Base is your room but underground instead. The Spheres you've obtained through treasure hunting can be traded for items that allow you to personalize your Secret Base. While not necessary, I strongly recommend you bury your Spheres (and not forget where they are!) as this allows your Spheres to grow bigger. In fact, if you bury Spheres of the same color together, they tend to fuse to form even bigger Spheres, though 99 is the maximum level of all kinds of Spheres. There are also some, such as the Prism and Pale Spheres, that take more time to grow when compared to the Green, Red, and Blue Spheres.
There is a wide variety of goods available for you to choose from when it comes to decorating your Secret Base. Most of these can be obtained from the traders, the Veilstone Department Store, and Mr. Goods in Hearthome City. Basically these are divided as follows:
- Chairs
- Dolls
- Electronics
- Flowers
- Maze Goods
- Shelves
- Tables
- Trophies
The only actual multiplayer aspect of the Underground. It doesn't run on Wi-Fi, so you're limited to just playing with your real life friends. The name is very much self-explanatory in that the goal of the game is, yes, you guessed it, to capture or steal your opponent's Flag and bring it to your own Secret Base. This is also the only aspect of the Underground where you can effectively use traps (setting up traps when treasure hunting is not advisable). Traps are buried on the floor and usually creates some kind of effect that either prevents or slows down your opponent from capturing your own Flag. Here is the complete list of traps you'll undoubtedly come across when playing this game:
- Alert Trap:
- Divided into four kinds depending on the message that appears on the screen after activating it.
- Bubble Trap:
- Bubbles will appear on the screen. (Use the stylus to free yourself from this trap.)
- Confuse Trap:
- Screws up your movement (e.g. when you press up the character moves down, etc.)
- Crater Trap:
- Traps you in a hole preventing any further movement. (Press any direction 20 times to free yourself.)
- Ember Trap:
- A small flame will attack you. (Blow on the mic to free yourself from this trap.)
- Fire Trap:
- Similar to the Ember Trap but harder to put out. (Blow on the mic to free yourself from this trap.)
- Flower Trap:
- A bunch of flower petals whirl up on the screen. (Blow on the mic to free yourself from this trap.)
- Foam Trap:
- Small bubbles will appear on the screen. (Use the stylus to free yourself from this trap.)
- Fog Trap:
- A bunch of smoke will appear on the screen. (Use the stylus to free yourself from this trap.)
- Hurl Trap:
- Hurls you either upward, downward, to the left, or to the right. (Can actually be useful for quick self-transportation.)
- Leaf Trap:
- Similar to the Flower Trap with leaves floating about instead of petals. (Blow on the mic to free yourself from this trap.)
- Move Trap:
- Throws you either upward, downward, to the left, or to the right. (Can actually be useful for quick self-transportation.)
- Pit Trap:
- Traps you in a hole preventing any further movement. (Press any direction 10 times to free yourself.)
- Reverse Trap:
- Forces you to move in the opposite direction from the direction you intend to go.
- Rock Trap:
- A rock falls on you preventing any further movement. (Use the stylus to free yourself from this trap.)
- Rockfall Trap:
- A big rock falls on you preventing any further movement. (Use the stylus to free yourself from this trap.)
- Smoke Trap:
- A bunch of smoke will appear on the screen. (Use the stylus to free yourself from this trap.)
Mix and match these traps and find out which combinations provide the most effective stallers. The Capture the Flag game's real use is the bonuses granted depending on your overall performance when playing with your friends. After capturing various numbers of opponents' Flags you get to unlock certain capabilities that allow you to really customize your Secret Base. Here's a list of all the Flag ranks to look out for.
- Normal Flag
- Requires: 0 captured Flags
- Allows you to place 10 different goods in your Secret Base.
- Bronze Flag
- Requires: 1 captured Flag
- Allows you to place 12 different goods in your Secret Base.
- Allows you to remove 1 rock from your Secret Base.
- Silver Flag
- Requires: 3 captured Flags
- Allows you to place 14 different goods in your Secret Base.
- Allows you to remove 5 rocks from your Secret Base.
- Gold Flag
- Requires: 10 captured Flags
- Allows you to place 15 different goods in your Secret Base.
- Allows you to remove 10 rocks from your Secret Base.
- Platinum Flag
- Requires: 50 captured Flags
- Allows you to place 15 different goods in your Secret Base.
- Allows you to remove all the rocks from your Secret Base.
- Upgrades your trainer card one rank
As you can see, you can gain a lot of benefits by playing Capture the Flag. After all, you can't have a beautiful Secret Base if it's littered with rocks, so hurry up and start linking with friends!